Designing in Figma
We use Figma to design icons for the set, though you can also use other software. This is a guide on how to design your icons in Figma for the set.
Step 1: Create a frame
Once you have a document opened, start by creating a 24px by 24px frame.
- Press
For the icon to create a new frame.
 - Drag your cursor to draw a 24px by 24px frame. You can change the size later in the Properties panel on the right.
Tip
Hold Shift to keep the width and height even while dragging.
- Change the name of the frame to the name of your icon
Step 2: Draw your shapes
Once you have your frame set up, start adding shapes to your icon. The most common shapes you will use would be:
- Rectangle (
R) - Elipse (
O) - Custom path using the Pen tool (
P)
You can still use any shape.
Stroke properties
In the Properties panel, press the
 button beside Stroke to add a stroke if you haven't already.
Set the following properties for your shapes:
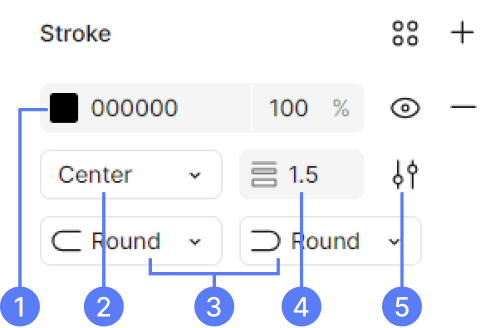
- Stroke color: Set this to black (
#000) - Stroke alignment: This should always be centered
- Stroke caps: Set both of these to Round. Depending on your shape, this may not be shown.
- Stroke width: Set this to
1.5 - Advanced stroke settings
- Stroke color: Set this to black (
Click on Advanced stroke settings as shown above, and set the following properties:
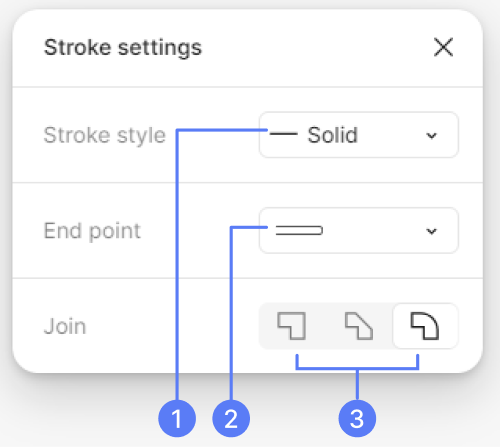
- Stroke style: Leave as Solid unless you are making a dotted shape
- End point: Set this to Round if you have this option
- Join: Set this to Round (third option)
Tip
If you want these properties to automatically be applied to new shapes, go to Figma logo > Edit > Set default properties or Ctrl + //Command + / > Set default properties after setting your properties on your shape. Note that this may not work for all shapes.
Step 3: Export your icon
Once you have your icon designed, follow the steps in our contributing guide on how to export your icon.